The
ACTIVE
MAMA


We've decided with my husband to paint our bathroom and to make it in white and chocolate brown.
I've already made toilet in this way, but I was not so convinced to paint tiles in the shower... I was affraid that it will not stay.. it will start to remove, etc. But I decided to try and to see if it will work.
Now I don't regret, because the bathroom before was really old looking.
How I did?
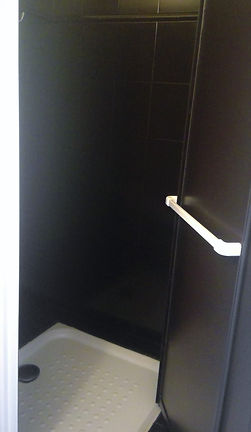
I started with washing all tiles with acetone. My husband helped me with removing the fournitures. I proteted everything with a tape. And I started to paint with brown colour in the shower (it was a really specific paint for the shower, 6h between 2 layers, 24h 3rd layer with a protection and few days without putting the water on it)
I wanted to make a white line around... so I spent a lot of time to make it really nice, but when I took off the tape.. I become to be soo angry... (as you can see - the effect at the upper picture).. the tape took white and brown paint.. I was really angry, so I decided to paint everything in brown - the effect is even better than I accpected. (The problem was the tape, when you decide to paint the tailes take a correct tape!)
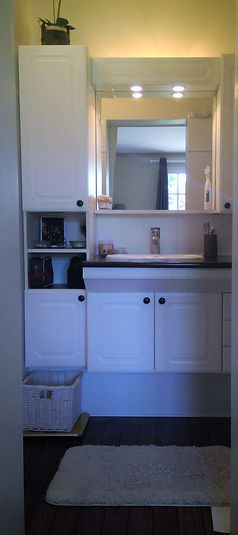
I painted also the doors of the furnitures and put new, chocolate brown, round handles.
I took the shower door and after cleaning it by my husband, I painted it in brown.
The same for the top of the furniture - I decided to make it in brown as well.
After the shower I started to paint all bathroom in white. With this paint I needed to put 4 layers... 2nd layer was not covering enough the tailes. Here I wanted to make brown line.. but.. as I saw "the effect" in the shower I decided to paint everything in white and to not waste my time.
I finished to put 4th layer, I painted the shower with a protection and all the parts with will have intensive contact with the water.
We started with the floor. It's an imitation of a wood - we decided to put it across and not horizontally, so that optically we've extended the bathroom.
After cutting, we glued it with white strips.
At the end we put silicone in the places to block any water leak.
As you can see, the effect is quite interesting and the most important is that it's working good for the moment, nothing is removing.. we will see with the time.
In general it took us almost 1 week, mostly because of the drying process.
To see another creations, check my Atelier and enjoy! :-)
Small Bathroom

Before

After
To see more creations
check Atelier